The Problem
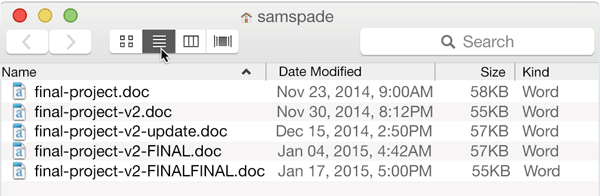
If you happen to go through the following scenario as you are struggling to keep renaming the updated files, then version control system is an option foryou.
- index.html
- index_new.html
- index_new_v2.html
- index_new_v4.html
- index_new_v2_final.html
- index_new_v2_really_final.html
Solution
However, when it comes to maintaining a record of changes in documents, structure is required. That’s where version control (also known as source or revision control) comes in.
Version control is a system that records the changes made to a file or set of tiles over time in such a way that it is possible to recover specific versions later. If a mistake is made. clevelopers/ designer can turn back the clock and compare earlier versions of the code to help fix the mistake while minimizing disruption to all team members.
Version cintrol system is useful because:
- You can revert back to specific ‘versions’ of your code.
- Collaboration on the same work is possible because specific changes and associated contributors are tracked.
Git as the state of the art in version control. One can maintain multiple versions of a file, conduct multiple experiments and yet preserve a clean “latest” version of work. It lets users roll back their changes when needed, and one can even rewrite history when you feel like it.
Local Version Control System
Many people’s version—control method of choice is to copy files into another directory or rename the files. This approach is very common because it is so simple, but it is also incredibly error prone. It is easy to forget which directory you’re in and accidentally write to the wrong file or copy over files you don’t mean to. To deal with this issue, programmers long ago developed local VCSs that had a simple database that kept all the changes to files under revision control.
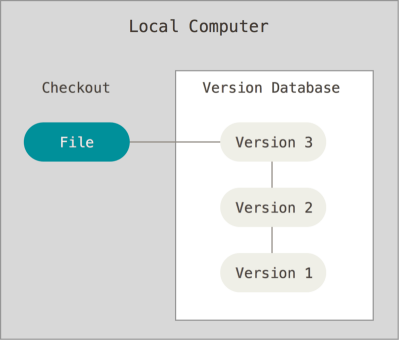
One of the more popular VCS tools was a system called RCS, which is still distributed with many computers today. RCS works by keeping patchsets (that is, the differences between files) in a special format on disk; it can then re—create what any file looked like at any point in time by adding up all the patches.
Centralized & Distributed Version Control System
Centralized version control systems are based on the idea that there is a single “central” copy of your project somewhere (probably on a server), and programmers will “commit” their changes to this central copy. Centralized version control systems like Subversion (SVN), CVS, Perforce.
Distributed version systems do not necessarily rely on a central sen/er to store all the versions of a project’s files. Instead, every developer “clones” a copy of a repository and has the full history of the project on their own hard drive. This copy (or “clone”) has all of the metadata of the original. Some distributed version control systems are Git, CVS, Subversion, Mercurial.

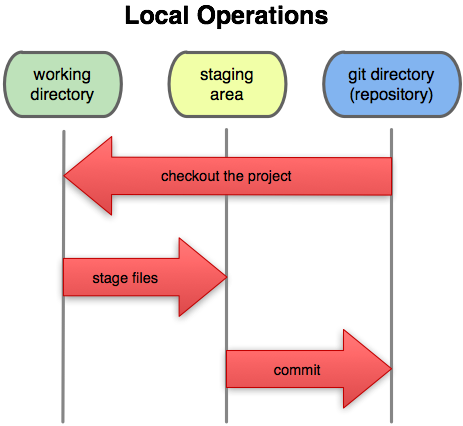
Simple Work-flow of Version Control System
- Pull down any changes other people have made from the central server.
- Make your changes, and make sure they work properly.
- Commit your changes to the central sen/er, so other programmers can see them.
Git and Github
Git is a free and open source version control system, originally created by Linus Torvalds in 2005. Unlike older centralized version control systems such as SVN and CVS, Git is distributed: every developer has the full history of their code repository locally. Github github.com is a service for hosting software repositories managed by the Git version control system.
Pull Work-flow: Working on your own project
- Create an empty project on GitHub.
- Create an empty project in your local hard disk using git.
- Add the GitHub repo to the local project.
- Pull] Fetch remote project into local one.
- Make some changes in the local project.
- Add changed files to got for tracking (staging).
- Commit.
- Push the project into GitHub.
Clone Work-flow : Working on your own project
- Create an empty project on github.
- Clone the project into local hard disk.
- Make some changes in the project.
- Add changed files to got for tracking (staging).
- Commit.
- Push the project into GitHub.
Pull vs Clone
Git pull: when you do a git pull, it gets all the changes from the remote or central repository and attaches it to your corresponding branch in your local repository.
Git fetch: when you do a git fetch, it gets all the changes from the remote repository, stores the changes in a separate branch in your local repositoiy and if you want to reflect those changes in your corresponding branches, use a git merge to do that. To summarize,
git pull = git fetch + git merge
Fork work-flow: Contributing to other’s project
- Fork the project.
- Create a topic branch from master .
- Make some commits to improve the project.
- Push this branch to your GitHub project.
- Open a Pull Request on GitHub.
- Discuss, and optionally continue committing.
- The project owner merges or closes the Pull Request.
Fetch, Clone, Fork
git clone is basically a combination of:
git init(create the local repository)git remote add(add the URL to that repository)git -Fetch(fetch all branches from that URL to your local repository)git checkout(create all the files ofthe main branch in your working tree)
Therefore. no, you don’t have to do a git init , because it is already done by git clone . Forked repositories are generally “sen/er»side clones” and usually managed and hosted by a 3rd party Git service like Bitbucket and Github.
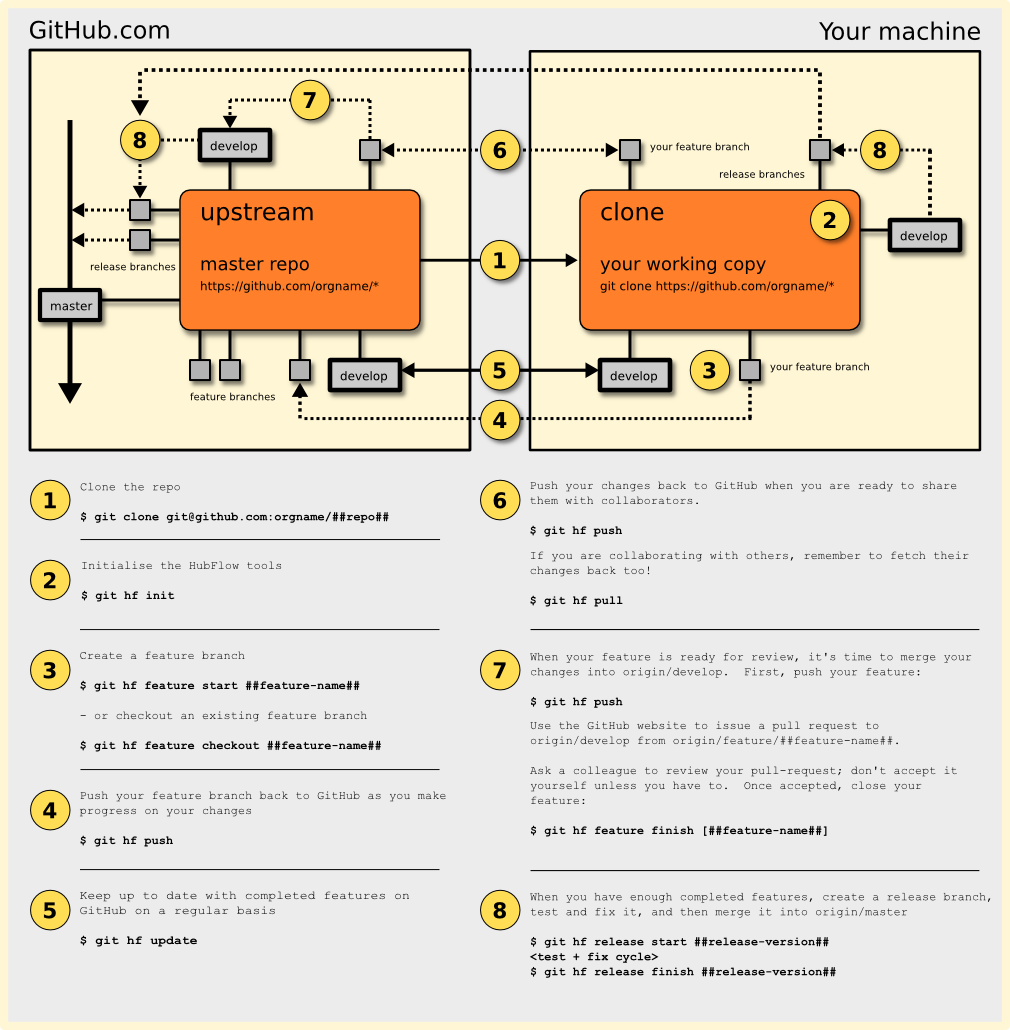
Git Flow
The Git Flow is the most known workflow on this list. It was created by Vincent Driessen in 2010 and it is based in two main branches with infinite lifetime:
master —this branch contains production code. All development code is merged into master in sometime.
develop —this branch contains pre—pr0duction code. When the features are finished then they are merged into develop.
During the development cycle, a variety of supporting branches are used:
feature —feature branches are used to develop new features for the upcoming releases. May branch off from develop and must merge into develop .
hotfix- —hotfix branches are necessary to act immediately upon an undesired status of master .
release- —release branches support preparation of a new production release. They allow many minor bug to be fixed and preparation of meta-data for a release. May branch off from develop and must merge into master and develop.
Advantages
- Ensures a clean state of branches at any given moment in the life cycle of project
- The branches naming follows a systematic pattern making it easier to comprehend
- It has extensions and support on most used git tools
- It is ideal when there it needs to be multiple version in production
Disadvantages
- The Git history becomes unreadable
- The master/develop split is considered redundant and makes the Continuous Delivery and the Continuos Integration harder
- It isn’t recommended when it need to maintain single version in production.
Installing Git on Linux
sudo apt-get update
sudo apt-get upgrade
sudo apt-get install git
In case of any problems:
$ sudo add-apt-repository ppa:git-core/ppa
$ sudo apt-get update
$ sudo apt-get install git
Configuring Git
To set user name and email, run the following command
$ git con~Fig "global user.name "your" name"
$ git config -global user.email "yourname@nail.com"
To check it, run
git config --list
user.name=zahidhasan
user.email=zahid.hasan@msn.com
core.repositoryformatversion=9
core.fi1emode=fa1se
core.bare=false
core.loga1lrefupdates=true
Pull Work-flow
Create an empty project directory
# create a project tolderc
$ mkdir myproject
$ cd myproject
Initialize git
Assuming you’ve already created an empty directory for your project. just run the following command.
$ git init
Initialized empty Git repository in /home/zahidhasanlmyprojectl.git/
# After a repository creation message, if we show the contents
aw of the Folder with an ls —al we will see a hidden ~Fo1der (.git):
$ ls -al
. git
The init command stands for initialize. Once you run git init, Git will initialize a hidden directory called .git in the project’s root directory.mAnd you’ll get a confirmation that your deposit box is ready!
Within the folder .git we will have several sub-folders some of them are the following:
- HEAD : for the registration of headers.
- branches : the different versions that we are uploading.I config :the configuration file.
- description : the description.
- hooks : for the execution of scripts necessary for git operation.
s cd .git/
$ ls »al
total 49
drwxrwxr-x 7 zahidhasan zahidhasan 4896 Dec 18 11:58 .
drwxrwxr-x 3 zahidhasan zahidhasan 4896 Dec 18 11:58 . .
drwxrwxr-x 2 zahidhasan zahidhasan 4896 Dec 18 11:58 branches
»rw-rw-r-- 1 zahidhasan zahidhasan 92 Dec 18 11:58 config
»rw»rw-r-- 1 zahidhasan zahidhasan 73 Dec 18 11:58 description
-rw-rw-r-~ 1 zahidhasan zahidhasan 23 Dec 18 11:58 HEAD
drwxrwxr-x 2 zahidhasan zahidhasan 4896 Dec 18 11:58 hooks
drwxrwxr-x 2 zahidhasan zahidhasan 4896 Dec 18 11:58 info
drwxrwxr-x 4 zahidhasan zahidhasan 4896 Dec 18 11:58 objects
drwxrwxr-x 4 zahidhasan zahidhasan 4896 Dec 18 11:58 refs
Check Status
$ git status
On branch master
No corrlnits yet
nothing to conlnit (create/copy files and use "git add" to track)
Now create a new file (introduction.text) with some text in the myproject folder and run git status again.
~/myprojecti cat>introduction.txt
git tutorial
$ git status
On branch master
No colrlnits yet
Untracked files:
(use "git add <file>..." to include in what will be committed)
introduction.text
nothing added to commit but untracked files present (use "git add" to track)
We need to add the introduction.md file to git for tracking and changes.
Stage: Add files to Git for tracking
To stage a file is simply to prepare it finely for a commit. Git, with its index allows you to commit only certain parts of the changes you’ve done since the last commit.
Select all file and add them
$ git add --all
or
$ git add
$ git status
On branch master
No conlnits yet
Changes to be committed:
(use "git rm --cached <File>..." to unstage)
new file: introduction.txt
To see the changes in file
$ git diff --color
diff --git a/introduction.txt b/introduction.txt
index bd8134f..6783b3a 188644
--- a/introduction.txt
+++ b/introduction.txt
@@ -1 +1,4 @@
git tutorial
+introduction
+
+test
Commit
A commit to a repository is a snapshot of the current state of the project’s root directory.
$ git commit -m “we modified introduction.text” [master (root-commit) 938b97e] we modified introduction.text 1 file changed, 4 insertions(+) create mode 188644 introduction.txt
```ps
$ git status
On branch master
nothing to commit, working tree clean
$ git commit -a -m "Do something once more"
the “—a” option, which stands for “add”.
Link the Local project to Remote one (Github)
Create an empty repository in Github in this case I myproject. Copy the web address of the git repo that your local folder will use to push its contents to the remote folder on Github.
$ git remote add origin [copied web address]
$ git remote add origin httpsI//github.com/ZahidHasan/myproject.git
If you want to see where each remote is pointing, type in :
$ git remote -v
origin https://github.com/ZahidHasan/myproject.git (fetch)
origin https://github.com/ZahidHasan/myproject.git (push)
origin = The default name of the remote repository on GitHub corresponding to the repo you’re currently in on your machine.
Pull the remote contents into local one
$ git pull --allow-unrelated»histories origin master


remote: Enumerating objects: 3, done.
remote: Counting objects: 186% (3/3), done.
remote: Total 3 (delta 6), reused 8 (delta 8), pack-reused G
Unpacking objects: 188% (3/3), done.
From https://github.com/ZahidHasan/myproject
* branch master -> FETCH_HEAD
* [new branch] master -> origin/master
tmrge made by the ‘recursive’ strategy.
README.md l 1 +
1 file changed, 1 insertion(+)
create mode 188644 README.md
Push the local contents to Github
$ git push origin master


Username for 'https://github.com': zahid.hasan@msn.com
Password for 'https://zahid.hasan@msn.c0m@github.com’:
Counting objects: 5, done.
Delta compression using up to 4 threads.Compressing objects: 188% (3/3), done.
writing objects: 188% (5/5), 569 bytes l 569.88 KiB/s, done.
Total 5 (delta 8), reused 8 (delta 8)
To https://github.com/ZahidHasan/myproject.git
4e5fb77..ea28eZ8 master -> master
Permanently authenticating with Git repositories
$ git config credential.helper store
$ git push https://github.com/repo.git


Username For 'https://github.com': <USERNAHE>
Password for 'https://USERNfiME@github.com': <PASSw0RD>
Branches
A branch is a version of our code. Git allows us to move between versions in a simple way. The creation of branches allows us to work in different versions of the same file and when we consider it we can merge the changes. Making changes directly to your master branch is a bad idea. You should always have a working branch to try out your modifications on.
To list the available branches for your current project, type in :
$ git branch

master
‘ mybranch
To create a new branch, naming it whatever you want, type in :
$ git branch branch_name
To delete a branch, type in :
$ git branch -D branch_name
To switch to a branch, making it the currently active branch. type in :
$ git checkout branch_name
As an example, in order to return to your master branch, you would type in
$ git checkout master
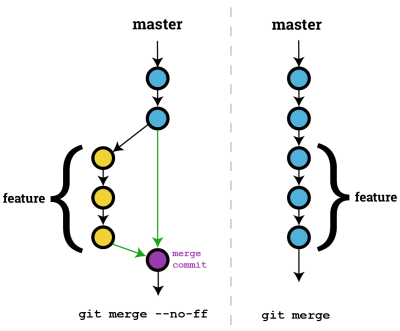
Merging code between branches
To merge the changes from the develop branch to the master branch, type the following:
$ git merge develop V-no~ff
Show Git Commit History
$ git log

commit cc613c7b821b59dS513b3e4F8342fc3962d6364e (HEAD -> development, mybranch, master)
Author: zahidhasan <zahid.hasan@msn.com>
Date: Sun Dec 16 17:18:19 2818 +8688
rafin

commit c686964aeb219d9f8e12a7427467b42891ceccd6Author: zahidhasan <zahid.hasan@msn.com>
Date: Sun Dec 16 17:87:83 2818 +8688
test
Restore/ Undo/ Recover Git
TBD
Clone Work-flow
TBD
Fork Work-flow
TBD